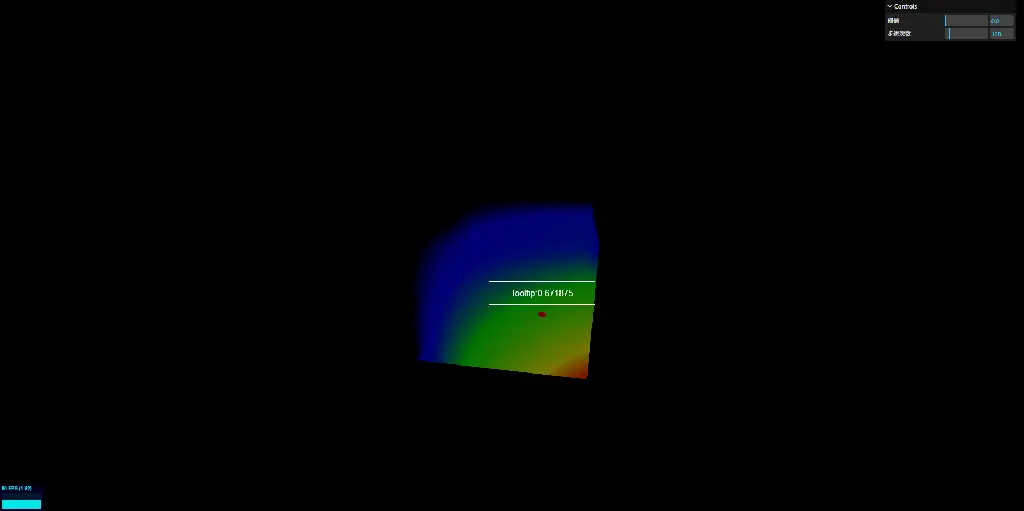
3d热力图-体积版 · volumeHeatmap · ▶ 在线运行案例
案例合集: 三维可视化功能案例(threehub.cn)
开源仓库github地址: https://github.com/z2586300277/three-cesium-examples
**400个案例代码: ** 网盘链接
你将学到什么
- ShaderMaterial 自定义着色器实现核心视觉效果
- OrbitControls 相机轨道交互
- Canvas 动态纹理贴图
- Raycaster 鼠标拾取与交互
- CSS2D/3D 标签 DOM 叠加
requestAnimationFrame渲染循环与resize自适应
效果说明
本案例演示 3d热力图-体积版 效果:创建一个取色带,用 Canvas 2D 绘制内容并实时映射为 Three.js 纹理;核心用到 ShaderMaterial、OrbitControls、Canvas。建议先打开文首在线案例查看动态画面,再对照下方源码逐步理解。
核心概念
- Scene / Camera / WebGLRenderer 构成最小渲染闭环;大场景可开
logarithmicDepthBuffer缓解 Z-fighting。 - ShaderMaterial 通过
uniforms+ 自定义 GLSL 控制逐像素/逐点效果;透明粒子常配合depthTest: false。 - OrbitControls 提供轨道旋转/缩放;开启
enableDamping后需在 animate 中controls.update()。 - CanvasTexture 每帧或按需把 2D Canvas 内容上传 GPU,适合动态文字、图表、视频帧贴图。
- Raycaster 将屏幕坐标转为射线,与场景求交得到世界坐标,常用于绘制/拾取。
实现步骤
- 搭建灯光与环境(如有)
- requestAnimationFrame 循环 update + render
代码要点
import * as THREE from 'three';
import Stats from 'three/examples/jsm/libs/stats.module.js';
import {OrbitControls} from 'three/examples/jsm/controls/OrbitControls.js'
import {GUI} from "three/addons/libs/lil-gui.module.min.js"
import { CSS2DRenderer, CSS2DObject } from 'three/examples/jsm/renderers/CSS2DRenderer.js'
console.log('Three.js 版本:', THREE.REVISION);
const gui = new GUI()

// 初始化场景、相机、渲染器
const scene = new THREE.Scene();
const camera = new THREE.PerspectiveCamera(75, window.innerWidth / window.innerHeight, 0.1, 10000);
camera.position.set(50, 100, 100)
camera.lookAt(0, 0, 0)
scene.add(camera);
const renderer = new THREE.WebGLRenderer({
    antialias: true,
    alpha: true,
    logarithmicDepthBuffer: true
});
renderer.outputColorSpace = 'srgb'
renderer.setSize(window.innerWidth, window.innerHeight);
renderer.setClearColor(0x000000);
document.body.appendChild(renderer.domElement);

const cssRender = new CSS2DRenderer()
cssRender.setSize(window.innerWidth, window.innerHeight)
cssRender.domElement.style.position = "absolute"
cssRender.domElement.style.top = "0"
cssRender.domElement.style.zIndex = "3"
cssRender.domElement.style.pointerEvents = "none"
document.body.appendChild(cssRender.domElement)

// 添加性能监控
const stats = new Stats();
document.body.appendChild(stats.dom);
// 初始化控制器
const controls = new OrbitControls(camera, renderer.domElement);
controls.enableDamping = true;


/**
 * 创建一个取色带
 */
function initPalette() {
    let canvas = document.createElement("canvas")
    canvas.width = 256
    canvas.height = 1
    let ctx = canvas.getContext("2d")
    let lgrd = ctx.createLinearGradient(0, 0, 256, 1)
    let gradient = {
        "0": "rgba(0,0,255,0.1)",
        "0.1": "rgba(0,0,255,1)",
        "0.3": "rgba(0,255,0,1)",
        "0.75": "rgba(255,255,0,1)",
        "1": "rgba(255,0,0,1.0)",
    }
    for (let key in gradient) {
        lgrd.addColorStop(parseFloat(key), gradient[key])
    }
    ctx.fillStyle = lgrd
    ctx.fillRect(0, 0, 256, 1)
    return canvas
}

const texture = new THREE.CanvasTexture(initPalette())


// 生成模拟热力数据 (64x64x64)
const size = 64
const data = new Float32Array(size * size * size)
const cutoffHeight = size * 0.8 // 80%高度处
// 存储热力图数据用于查询
const heatmapData = {
    size: 64,
    data,
}
for (let z = 0; z < size; z++) {
    for (let y = 0; y < size; y++) {
        for (let x = 0; x < size; x++) {
            // 1. 垂直方向渐变(底部1.0 -> 80%高度0.0)
            const verticalFactor = Math.max(0, 1 - y / cutoffHeight)

            // 2. 水平方向渐变(左侧0.0 -> 右侧1.0)
            const horizontalFactor = x / size

            // 3. 组合两种渐变(相乘得到最终值)
            data[z * size * size + y * size + x] =  verticalFactor * horizontalFactor

        }
    }
}
// 创建3D纹理时添加配置
const heatMapTexture = new THREE.Data3DTexture(data, size, size, size)
heatMapTexture.format = THREE.RedFormat
heatMapTexture.type = THREE.FloatType
heatMapTexture.wrapS = THREE.ClampToEdgeWrapping
heatMapTexture.wrapT = THREE.ClampToEdgeWrapping
heatMapTexture.wrapR = THREE.ClampToEdgeWrapping
heatMapTexture.needsUpdate = true
heatMapTexture.updateMatrix() // 关键!
const material = new THREE.ShaderMaterial({
    uniforms: {
        uVolume: { value: heatMapTexture },
        uColorMap: { value: texture }, // 传入取色带纹理
        uResolution: { value: new THREE.Vector3(size, size, size) },
        uCursorPos: { value: new THREE.Vector3(-1000, -1000, -1000) }, // 初始值设为屏幕外
        uCursorRadius: { value: 2.0 }, // 高亮区域半径
        uThreshold: { value: 0.01 }, // 显示阈值
        uSteps: { value: 128 }, // 光线步进次数
    },
    vertexShader: `
    varying vec3 vWorldPosition;
    varying vec3 vLocalPosition; // 新增局部坐标传递
    void main() {
      vWorldPosition = (modelMatrix * vec4(position, 1.0)).xyz;
       vLocalPosition = position; // 传递局部坐标(-size/2到size/2)
      gl_Position = projectionMatrix * modelViewMatrix * vec4(position, 1.0);
    }
  `,
    fragmentShader: `
      uniform sampler3D uVolume;
      uniform vec3 uResolution;
      uniform float uThreshold;
      uniform sampler2D uColorMap; // 取色带纹理
      uniform int uSteps;
      varying vec3 vWorldPosition;
      varying vec3 vLocalPosition;

      uniform vec3 uCursorPos;
      uniform float uCursorRadius;

      // 热力值转颜色(保持不变)
      vec3 heatmap(float value) {
        return texture2D(uColorMap, vec2(clamp(value, 0.0, 1.0), 0.5)).rgb;
      }

    void main() {
      // 1. 计算光线起点(相机位置)和方向(指向当前像素)
      vec3 rayOrigin = cameraPosition;
      vec3 rayDir = normalize(vWorldPosition - cameraPosition);

      // 2. 计算光线与立方体的交点(避免从内部开始)
      vec3 boxMin = -uResolution * 0.5;
      vec3 boxMax = uResolution * 0.5;
      vec3 tMin = (boxMin - rayOrigin) / rayDir;
      vec3 tMax = (boxMax - rayOrigin) / rayDir;
      vec3 t1 = min(tMin, tMax);
      vec3 t2 = max(tMin, tMax);
      float tNear = max(max(t1.x, t1.y), t1.z);
      float tFar = min(min(t2.x, t2.y), t2.z);

      // 3. 调整起点到最近的交点
      rayOrigin += rayDir * tNear;

      // 4. 光线步进参数
      float stepSize = (tFar - tNear) / float(uSteps);
      vec4 color = vec4(0.0);

      // 5. 光线步进循环
      for (int i = 0; i < uSteps; i++) {
        vec3 samplePos = rayOrigin + rayDir * float(i) * stepSize;
        vec3 uv = (samplePos / uResolution) + 0.5; // 转换到纹理坐标

        if (any(lessThan(uv, vec3(0.0))) || any(greaterThan(uv, vec3(1.0)))) continue;

        float density = texture(uVolume, uv).r;
        if (density < uThreshold) continue;

        vec3 heatColor = heatmap(density);
        float alpha = density * 0.5; // 提高透明度系数

        // 从前到后混合
        color.rgb += (1.0 - color.a) * alpha * heatColor;
        color.a += (1.0 - color.a) * alpha;

        if (color.a > 0.95) break;
      }

      // 添加光标交互高亮
      float dist = distance(vLocalPosition, uCursorPos);
      if (dist < uCursorRadius) {
        color.rgb = vec3(1.0, 0.0, 0.0);
      }

      gl_FragColor = color;
      gl_FragColor.a = clamp(color.a, 0.0, 1.0)*0.5; // 确保透明度在0到1之间
}
  `,
    side: THREE.BackSide, // 从内部渲染
    transparent: true,
    alphaTest: 0.01, // 避免低透明度片元被丢弃
})


gui.add(material.uniforms.uThreshold, "value", 0, 1).name("阈值")
gui.add(material.uniforms.uSteps, "value", 16, 1000).name("步进次数")


const geometry = new THREE.BoxGeometry(size, size, size)
const mesh = new THREE.Mesh(geometry, material)

// 帧循环
function animate() {
    requestAnimationFrame(animate)
    renderer.render(scene, camera);
    cssRender.render(scene, camera);
    stats.update();
    controls.update();
}

animate();

const raycaster = new THREE.Raycaster()
const mouse = new THREE.Vector2()
scene.add(mesh)
const element = document.createElement("div")
element.style.position = 'absolute';
element.style.width='200px'
element.style.height='44px'
element.style.textAlign = 'center'
element.style.border = '1px solid #ffffff'
element.style.lineHeight = '44px'
element.style.color='#ffffff'
const label = new CSS2DObject(element)
label.position.set(0, 0, 0)
scene.add(label)


function onMouseMove(event) {
    // 转换鼠标坐标到标准化设备坐标 [-1, 1]
    mouse.x = (event.clientX / window.innerWidth) * 2 - 1
    mouse.y = -(event.clientY / window.innerHeight) * 2 + 1

    checkIntersection()
}

function checkIntersection() {
    // 更新射线
    raycaster.setFromCamera(mouse, camera)

    // 检测与热力立方体的相交
    const intersects = raycaster.intersectObject(mesh)

    if (intersects.length > 0) {
        const point = intersects[0].point

        mesh.worldToLocal(point)
        material.uniforms.uCursorPos.value.copy(point)
        // 转换世界坐标到纹理坐标 [0,1]
        const uv = new THREE.Vector3()
            .copy(point)
            .add(new THREE.Vector3(size / 2, size / 2, size / 2)) // 补偿立方体中心偏移
            .divideScalar(size)

        // 获取精确数据值
        const value = getDataAtUV(uv)

        label.position.set(point.x, point.y+15, point.z) // 提示标签位置
        element.innerText = `${value}`
        label.visible = true
        // // 显示数据(示例:控制台输出+屏幕提示)
        // console.log(
        //   `坐标: (${point.x.toFixed(2)}, ${point.y.toFixed(2)}, ${point.z.toFixed(2)}) 热力值: ${value?.toFixed(4)}`
        // )
    } else {
        // 鼠标未指向时重置位置(隐藏高亮)
        material.uniforms.uCursorPos.value.set(-1000, -1000, -1000)
        label.visible = false
    }
    // 标记需要更新uniforms
    material.uniformsNeedUpdate = true
}

function getDataAtUV(uv) {
    // 计算数据索引
    const x = Math.floor(uv.x * (heatmapData.size - 1))
    const y = Math.floor(uv.y * (heatmapData.size - 1))
    const z = Math.floor(uv.z * (heatmapData.size - 1))

    const index = z * size * size + y * size + x
    return heatmapData.data[index]
}

// 窗口大小调整
window.addEventListener("mousemove", onMouseMove)
window.addEventListener('resize', onWindowResize, false);
function onWindowResize() {
    camera.aspect = window.innerWidth / window.innerHeight;
    camera.updateProjectionMatrix();
    renderer.setSize(window.innerWidth, window.innerHeight);
    cssRender.setSize(window.innerWidth, window.innerHeight);
}
完整源码:GitHub
小结
- 本文提供 3d热力图-体积版 完整 Three.js 源码与在线 Demo,建议先运行案例再改 uniform/参数做二次实验
- 更多 Three.js 实战案例见 three-cesium-examples 合集 与 GitHub 开源仓库